KitchenAid Mixer Parts – Major Parts Overview
What are the Parts for KitchenAid Mixer? – KitchenAid Mixer Parts Explained
One of the things that separates a true kitchen wizard from the rest is familiarity with kitchen machines, and knowledge as to how they work. If you need a primer on the essential parts of your KitchenAid Artisan standing kitchen mixer, you’ve come to the right place.
Disclosure: Some of the links to products on this website are affiliate links. It simply means, at no additional cost to you, I'll earn a commission if you click through and buy any product. Read full disclosure here! Thank you for your support.
In this discussion article, we are going to talk about the basic parts of this great standing mixer. If you already have information as to what part you need to replace, you can head over to the KitchenAid USA website to see where you can get that part. Don’t forget to type in the exact model number, so you can get a list of actual parts for that model.

KitchenAid Artisan Mixer Parts – Major Ones
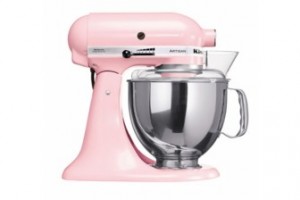
A KitchenAid Artisan standing kitchen mixer has seven major parts:
1. Mixing Bowl –The KitchenAid Artisan comes with a stainless steel mixing bowl. If your own bowl has dents, or doesn’t fit well with the mixer’s frame, you may want to get a replacement as the shape and condition of the mixing bowl does have an effect on the quality of your final output.
2. Bowl Clamping Plate – This is the locking mechanism just above the base of the KitchenAid Artisan. The Bowl Clamping Plate ensures that your mixing bowl doesn’t fly or fall off while the rotary motor is working hard to mix your dough.
3. Beater Height Adjustment Screw – Located in between the neck of the mixer and the motor head, the B.H.A.S. allows the user to tilt back the upper half of the mixer to control the position of the mixer attachment.
Consider replacing or having this part repaired if you are unable to tilt the mixer easily, or if it doesn’t lock in place even if you are tilting the motor head properly.
4. Speed Control Knob – Located on the left side of the Motor Head, the Speed Control Knob gives the user access to all ten of the speed settings. This knob can become faulty if the knob is mishandled. Adjust the speed gently and make sure that your hand is dry before sliding the knob.
5. Motor Head – This is where all the action takes place. The Motor Head houses the unique 325 watt rotary motor that delivers all the mixing power that you will ever need. One clear sign that your motor head needs to be fixed is if it has trouble with mixing medium to heavy mixtures and dough.
6. Attachment Hub – The Attachment Hub is located in front of the Motor Head. The Attachment Hub juts out and has a flat, circular terminating point where attachments like the food grinder can be installed easily.
The hub has a knob at the side that is used to secure the actual attachment. Have a service center check out this part if your food grinder keeps falling off even if you have secured the knob properly.
7. Beater Shaft – The Beater Shaft is where you actually place one of the three attachments that come with every KitchenAid Artisan. This part can become loose over time, and the threading that is hidden from view may become worn out as well.
More INFO:
KitchenAid Mixers
Professional KitchenAid Mixer
KitchenAid Mixer Attachment
KitchenAid Mixer Accessories Parts
Recipe for KitchenAid Mixer
Video: Kitchen Aid Artisan
[Source: YouTube]
Do you have comments or questions? Please leave them below.
Did you find this article useful? Share it on Social Media below.
Link to this article by using the following URL: https://uniqsource.com/household/kitchenaid-mixer-parts/ COPY + PASTE

